Tuesday, July 4, 2017

The New House!

After 2 years of searching we finally found a new house!  The last time we moved I painted every single room, and left the kitchen for last- it's still not done.

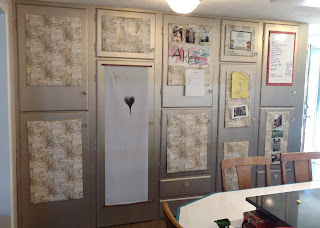
This time around I tackled the kitchen first.  The kitchen was the entire reason I bought the house...that wall of pantry space is kind of a necessity if you live 30 minutes from the nearest Wegman's.  It has miles of countertops, tons of storage, and a really sweet backstory.

The previous owner was a carpenter who did a complete remodel in a weekend to surprise his wife when she went away for the weekend.  I loved it, but it was SOOOO dark.

The day after closing we popped the cabinet doors off, and I started to paint.  The uppers are semi-gloss white, and the lowers are teal (the name escapes me- it's all from Benjamin Moore).  A tinted primer for the base cabinets made the job go a lot faster, and 2 coats of white Killz primer made it much easier to get them white white.


The pantry wall is a quart of Rustoleum Metallic paint in Champage- that stuff is tough to apply, it showed every single brush stroke, but I finally got a good finish with a flocked foam roller.  It looked really empty when I was done so I made bulletin boards out of foam core covered in wrapping paper, and stuck them on with Velcro Command adhesive strips.


The large piece of white is "water writing paper" that I ordered from Hong Kong via eBay- if you have kids you really need a piece of this stuff.  Ali got a chunk of it in a Koala Crate, loved it, and we finally found some more on eBay.  I've never seen it in a store.  You paint on it with water, and it turns black, and then it dries back to white in about 10 minutes.  Every kid that's been in my kitchen has loved it, and it was $4.09 shipped.  Get a few scrolls- they make cool presents!


Once we started painting I wanted to change everything...it was kind of an addiction.  The countertops were re-coated with this kit:  http://www.homedepot.com/p/DAICH-SpreadStone-Mineral-Select-1-qt-Oyster-Countertop-Refinishing-Kit-4-Count-DCT-MNS-OY/206349259

That was a beast of a project- the painting part is pretty quick, but sanding the stone smooth was a serious challenge.  We used a palm sander, and I thought my arm was going to fall off by the time we were done.  I added some mineral glitter to the top coat because it's kind of my thing, and I really wanted something to reflect light.  I *love* the glitter.


With all of that we couldn't leave the back splash untouched.  I used caulk to fill in the grout lines, and then applied some repositionable vinyl wallpaper that was custom printed by Dataflow.  The maps are clip art from Etsy, and each map has a significance to us- places we've been, places our ancestors are from, and where we live now.  The self-adhesive vinyl wall paper is a dream to work with- it covered up all of the bumps, applied easily, and it's super duper scrubbable.

As I was making the whiteboard for pantry wall I popped a piece of whiteboard contact paper down on the island bar, and decided to cover the entire breakfast bar with it.  It's pretty much my favorite thing ever- Ali and I draw on it every day.  We practice writing, numbers, write notes to each other, draw tons and tons of cars, monster trucks, and tractors, and everyone who visits adds something to it.  I take a picture of the artwork, and then erase it every night.  It's become my guest book, my diary, and a way to connect people with the space.


I also added some motion-activated under counter lights from Amazon that make is so much brighter, and it's great task lighting.  

We've never really done a lot of DIY projects- so I kind of can't believe we pulled it off.  It was a lot of work, but we had a lot of fun doing it.

Tuesday, October 25, 2016

Tucker The Turtle

We've gone Tuck wild in our house lately.  Tucker the Turtle is the star of Tucker Turtle Takes Time to Tuck and Think a WONDERFUL book to help kids learn the turtle technique.  It's a completely free download available here:
Tucker Turtle Book

***Spoiler Alert***
Tucker teaches kids to "think like a turtle" by stopping, tucking in, taking three deep breaths, and thinking of a solution

It's worked a miracle in our house!  Everyone is much calmer, and happier.  We have a Tucker puppet, pocket sized crochet turtles, a turtle Pillow Pet, and more.  We have big plans for Tucker so stay tuned.

Today we have a Tucker Puzzle.  What's cool about this puzzle is that it's EASY to make.

Start by getting the file here:
Tucker Puzzle

Then laminate the sheet for extra durability.
Then cut the pieces out, glue them to large craft sticks, and attach magnets if you'd like.
With the other side cut it into pieces, and tape it back together on the back with tape so it can fold neatly for storing in a pencil case.

That's all there is to it!

Sunday, August 9, 2015

Surprise Egg Salvation...with Rainbow Rice!

Is your toddler into the Surprise Egg videos as much as mine?  Do they make you want to run screaming, and smash all the tablets in the house?  Yes...me too.

I've come to offer you salvation!  Salvation for a mere $2.99 plus a little food coloring.  

I present to you the Rainbow Rice Surprise Bucket:

It's all of the mysterious fun of a surprise egg without the annoying egg part.


Step 1:  Make some rainbow rice


Rainbow rice is super easy to make.  I like to dry mine in the microwave so it's a very fast, very simple project.

You need:
A big bag of cheap rice
Food Coloring
Rubbing Alcohol
A few paper plates
A few zip baggies

To make the rainbow rice put 2-3 cups of dry rice in a zip top bag.  Then add about 2-3 tsps of rubbing alcohol (you can also use vinegar, or water, but rubbing alcohol dries the fastest), and a healthy squirt of food coloring.  Close the bag, and shake it up to coat the rice.

Dump the colored rice onto a paper plate, and toss it in the microwave for 1 minute.  Take it out, give it a stir, and nuke it again for 30 seconds or until it's dry.  It does clump together slightly, but the clumps break apart pretty easily.  You can also just let this air dry.

It's really about a 15-20 minute project, and then you can play for the rest of the day!

Step 2:
Put some toys in a bucket


Step 3:
Pour the rainbow rice into the bucket


Step 4:
Watch your darling be completely delighted with the same toys they thought were boring 10 minutes ago.  Try not to cringe if they say "Click to subscribe at the bottom" , or "Thanks for watching".


It's been a huge success!  I think we made a total of 6 surprise buckets today.  He played for HOURS with them, and the rice.

When they're done discovering their treasures the rainbow rice is a great sensory activity.  Ali loves to play with it using his construction vehicles.  Give them some cups, and sand toys, and they LOVE it.

Enjoy!

Tuesday, January 27, 2015

Shark Mittens!

I made Ali a shark hat using the pattern from my very most favorite crochet blog RepeatCrafterMe

http://www.repeatcrafterme.com/2013/08/crochet-shark-hat-pattern.html

And then I decided he needed some mittens to go with it, and this is what I came up with:


He loves them- although he hasn't quite worked out that sharks don't growl.  

These are pretty simple to put together, and they only use a few basic stitches.   It take about 45 minutes to crochet each mitten, and then about another hour to make and attach the details (I sew slowly). 

They're nice and long, and very warm because of the worsted weight yarn. 

Materials:  
Soft worsted weight yarn- Vanna's Choice, "I Love This Yarn", Red Heart Soft in grey
Yarn needle
4 small black buttons
red, and white felt
sewing needles and thread
H crochet hook.

Size- toddlers ages 3-4. 


Row 1:  In a magic loop chain 2  11 hdc join in first HDC to hide the seam.
Row 2:  Chain 1, 2HDC per stitch (22 HDC). Join in first stitch of previous row.
Rows 3-7:   Chain 1,  22HDC join in first HDC. Join
Row 8:  Chain 1, 1HDC, CH 10, skip 10, 11 HDC, join.  (you're essentially making a big button hole).  
Row 9 Chain 1,  1 HDC,  work 10 HDC into the chain (leave a top loop for crocheting the mouth on later), 11 HDC, join
Row 10-14 ch 1, 22 HDC join
Row 15-18: 1 FPHDC, 1 BPHDC repeat around joining at the end of each round.  Break yarn, and weave in ends.

Mouth flap:
Starting 2 stitches before the bottom left corner pick up 22 HDC stitches around.  Work 2hdctog in the corners so there are no gaps, and work the stitches in the back loop only of the HDCs.  Join.


Rows 2-5:  22 hdc, join in first stitch of previous row.
Rows 6&7: hdc2tog, join.

Break yarn, sew the end together, and weave in ends.

Mouth:  Cut 2 rectangular pieces of red felt big enough to line the inside of the mouth, and trim the corners so they're slightly rounded.  There's a .pdf pattern for the approximate size, but hold it up to your piece to make sure it fits.  You may need to make an adjustment.


Sew the red felt into place.

Teeth:  Cut two 1/2" strips of felt 11 inches long.  Cut each strip in half to make two 5-1/2" strips.  Snip approximately 12 teeth into each strip leaving them connected together with a small strip for sewing.  They don't have to be perfect- a little jagged, and uneven is fine.

Sew a strip of teeth onto the top and bottom of each side of the mouth.  


Fin- make two:  
Go to http://www.repeatcrafterme.com/2013/08/crochet-shark-hat-pattern.html
Follow the pattern for the first 9 rows of the fin.  Break yarn, and sew on.

And the action shot....the hat is from this pattern on Etsy- it's a great pattern, and includes lots of different sizes. 


If the sharks are a little too fierce this pattern is pretty versatile.  Here's his Elmo mittens made from the same pattern:


Enjoy!


Thursday, August 28, 2014

Frozen Theme Pizza Box Paperdoll Playset

My niece is turning 4 this week, and guess what her favorite movie is?  Yes, Frozen.  I was looking up some Frozen printables to add to her birthday package, and stumbled upon the most gorgeous set of Frozen paper dolls made by Corey Jensen.  So, I decided to make her a Frozen theme Pizza Box play set!


I'm still awestruck by the beauty of the paper dolls he makes.  He's the Bob Mackie of paper dolls.
Checkout his Facebook page for the printables.  They're amazing!

After I found those, I decided to make her a pizza box playscape to hold them all.  I'm kind of addicted to decorating pizza boxes to house toys.  They're portable, and they encourage kids to put their toys away when they're done playing with them.

They also look pretty fancy, but are made with some basic dollar store craft materials, and all-told cost about $3.00 for the supplies.

Materials:

  • This Printout- it's six 8-1/2 x 11" pieces of paper
  • A 12.25 inch pizza box (our local pizza place's small box)
  • Spray Adhesive- I like Elmer's Brand.  It's pretty widely available, and about $4.00 a can
  • Clear cellophane gift basket wrap (the dollar store has it).  You can skip this step, but it makes it more durable and scuff proof.
  • Pretty tape- I used some sparkle duct tape
  • Self-adhesive Velcro
  • Wrapping paper to decorate the outside of the box
Supplies:
  • Box cutter
  • Scissors
For the "crystal" paper doll stands:
  • aluminium foil
  • hot glue
  • paper clips
  • crystals- I had a box from the floral department of the craft store.  I think they use them to fill vases.

To make the pizza box

Print out this handy .pdf file
Trim off the excess paper- there is some overlap in the file, so you don't have to cut it exactly.  Scissors work just fine.  Just make sure all of the white boarders are removed.

Dry fit it in the inside of your pizza box, then glue it down with the spray adhesive.

Then coat the entire inside with another coat of spray glue, and cover it with the cellophane.

Flip it over, and apply the wrapping paper with more spray glue.  Add any other decorations or personalization then cover it with the gift basket cellophane adhered with more spray glue.

Then use the box cutter to trim the excess from around all of the sides, and slit the paper around any vent holes.

Line the inside of the box with your pretty duct tape, and seal the edges well with some more duct tape (I cut strips in half for this part).

Then apply the Velcro so that the lid stands up, and you're done!


To make the doll holders:
Put a small plop of hot glue on a piece of aluminium foil, and stick a paper clip upright in the middle of it.  Hold it in place until the glue cools


Trim the foil leaving a margin so there's enough to wrap around the glue ball you just made:

Then use the crystals to decorate it:

I'll be filling this with the paper dolls, and some other Frozen theme things- like sparkly playdough, and maybe a lip balm.

This is my first kind of tutorial- let me know if you have any questions!


Sunday, August 17, 2014

Upcycled Pizza Box Race Track

Ali is a little gearhead.  Cars, trains, motorcycles, and especially trucks- he loves to run them all over the coffee table, and to line them up on pretty much any flat surface.

Grandma bought him 5 gallon zip-lock bags FULL of cars at a yardsale, and I've been trying to figure out a good way to keep them all in one place so we don't trip on them.

It dawned on me- a pizza box would be *perfect* for a little race track for him.  I looked online for race track printables and didn't see anything that really tripped my trigger, so I made one in Photoshop using Watkins Glen International as the basis.


It's actually pretty easy to put together...I'm guessing it would take about 30 minutes from start to finish if you don't have any "help" :)

Materials:

  • Cleanish pizza box
  • print out of race track
  • Spray adhesive (works best for cardboard crafts because it doesn't have any water, so the cardboard doesn't warp)- you could use white glue, or even wheat paste but it may warp the cardboard.  I like Elmer's brand from Dollar General 
  • Wrapping paper, or contact paper for the outside
  • Duct tape
  • Self-adhesive velcro
  • Optional Clear cellophane basket wrap from the dollar store.
Supplies:
  • A box cutter for trimming the excess wrapping paper
  • Scissors for trimming the printouts


Print out this handy .pdf I made (I'm not a great graphic designer, but this is fine for a toddler).  It's sized to fit a 16" x 34" pizza box, and prints out on nine 8-1/2 x 11" pieces of paper.

Trim off the white edges, and dry fit it inside the pizza box.  There is some overlap so the printing/cutting isn't quite as critical.  Then spray the box with glue, and attach the prints.

I did put a layer of clear cellophane basket wrap on top of the printout- adhered with more spray adhesive.

Then decorate the outside.  I used some shiny red wrapping paper I had laying around, and covered it with more cellophane for a little extra durability.

When you've covered and trimmed both sides seal the edges well with some tape- duct tape, packing tape, washi tape.  I found that if they aren't sealed well the paper does start to come loose from the box after a while.


The handle, and closures are just folded over duct tape with a little bit of Velcro to secure it.


The car storage bag is just a slider zipper sandwich bag covered in more duct tape for stability, and because well...duct tape.


I think he needs a train track next!


Sunday, June 15, 2014

And Now You Know What You're Getting for Christmas

I love giving presents...but I don't love wrapping them.  I never seem to have the right paper for the right occasion, and overall it just seems wasteful.  So I'm always on the lookout for easy/fun/versatile ways to wrap a gift.

While researching stuff for Father's Day I found this amazing blog post:
http://www.ourbestbites.com/2012/06/tin-can-treats-fathers-day-edition/

Score!!!  I needed a new can opener anyway :)

The basic gist is you open a pop top can opener with a safety can opener give it a quick rinse, and then fill it up with presents, and put the "lid" back on.  With the safety can opener it just pops back on.  You don't even have to glue it.

Then you decorate it- this is some recycled clip art I printed out.  Or you could leave the original label on, and let the recipient think you got them a can of peaches when you really got them a diamond ring, the keys to a new car- or some Legos.

This is what I came up with
I filled it with his favorite licorice, and he loved it!

Quick tips:
A regular can label is 4-1/4 inches tall, and about 10 inches around.  The usable "front" space is about 3-1/2 inches wide.
A 20-oz pineapple can is about the biggest you can go if you're using 8-1/2 x 11" paper.